Wednesday 26 January 2011

Söödavad kingitused

Söödavad kingitused

Eelmisel aastal olid minu jõulukingitusteks kõikvõimalikud isetehtud kommid, trühvlid, küpsised. Lisaks ka brownie-, kaneelipannkoogi- ja küpsisesegu purkides. Koostisained näevad kihiti purkipanduna minu meelest väga armsad välja, valmistamisõpetusele võib juurde kirjutada niisama häid soove, lisaks sellele on tegu läbiproovitud ja heaks kiidetud retseptidega (Allrecipes). Seda ideed tahakski teiega jagada, äkki kulub marjaks ära.
Isetehtud kink on ju alati tore nii kinkida kui kingiks saada.
Olenevalt purgi suurustest annab "segu" kogust kas kahandada või suurendada, ise kasutasin tavalisi moosi-, supi- ja kurgipurke, suurustes 0,5-st liitrist 2 liitrini.

Panen siia ka lingi, kus häid ideid söödavate-joodavate kinkide tegemiseks erinevatest kategooriatest. NB. Soovi korral saate purgi sisu suuremalt-lähemalt näha, klikkides fotol.


Söödavad-joodavad kingitused

Brownied (shokolaadikoogikesed) purgis
3dl (natuke vähem)=155g jahu + 1tl vaniljesuhkrut
1tl küpsetuspulbrit
1tl soola
1 1/4dl kakaod
4,5dl suhkrut
(ise lisasin veel shokolaaditükke, kusagil 30-40g, suhkrukihi sisse või enne pähklikihti)
60g hakitud pekaan- või kreekapähkleid

1. Sega kokku jahu, küpsetuspulber, sool ja vaniljesuhkur. Pane ained antud järjekorras kihiti liitrisesse* purki (NB. pühi peale kakao purkipanekut see seestpoolt kakaotolmust puhtaks, et teised kihid näha jääks või pane kakao purki läbi paberist keeratud torbiku).
(Mina tegin kõiki kihte topelt, jääb ilusam..korraga siis panin kõiki aineid pool kogust ja teise poole teiseks kihiks)
2. Lisa silt antud tekstiga:
Brownie-segu
Kuumuta ahi 175 kraadini. Määri ning riputa riivsaiaga üle 20x30cm vorm. Tühjenda purgi sisu suurde kaussi ja sega läbi. Lisa 175g sulatatud võid/margariini ja 4 muna. Sega ühtlaseks. Vala segu vormi ning küpseta 25-30minutit. Lase vormis jahtuda ning lõika 5cm ruututeks.

Küpsesed purgis ( imemaitsvad, said mu lemmikküpsise-tiitli lausa endale!)
1dl suhkrut
1dl (ja natuke peale) rosinaid
2 1/4dl kookoshelbeid
2dl maisihelbeid (purukstambituna...pudrunuiaga näiteks)
2 1/4dl pruuni suhkrut
1dl kiirkaerahelbeid
3dl jahu + 1tl küpsetuspulbrit + 1tl soodat + 1tl vaniljesuhkrut

1. Pane koostisained kihiti liitrisesse* purki antud järjekorras. Suru iga kiht enne järgmise kihi asetamist alla.
2. Lisa silt-lipik alljärgneva tekstiga:
Kuumuta ahi 175 kraadini. Vala purgi sisu kaussi ja sega läbi. Lisa 100g võid/margariini ja üks muna. Sega kuni kõik ained on omavahel korralikult segunenud. Võid kasutada käsi. Vormi taignast kreekapähklisuurused pallikesed ja pane 5cm vahedega küpsetuspaberiga kaetud plaadile. Küpseta 8-10 minutit. Lase enne plaadilt emmaldamist 5minutit jahtuda.
Saturday 8 January 2011

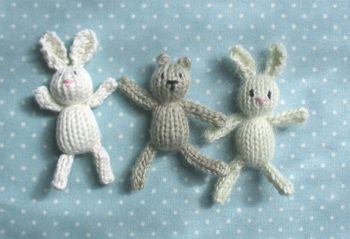
Tillud jänkukesed

Teeny tiny knitted toys

Sellised imearmsad jänkukesed! Autori palve; Palun ärge kopeerige neid müügiks ja ka minu poolne edastamine ei ole kommertseesmärgil.

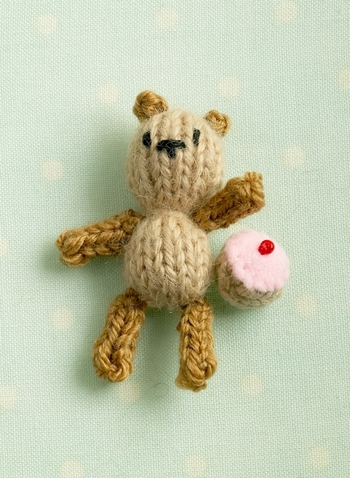
Here is a free pattern to make some teeny tiny toys - just under 2.5 inches (6 cms) tall

It's a wee bit fiddly but lots of fun!

Friends

What you will need:

some left-over scraps of 4ply yarn in pink, black and fur colour (brown/ cream / grey...) a small circle of felt (for the back of the face - to prevent the tiny stitches pulling through), 1 pair of 2.25mm needles and 2 double pointed 2.25mm needles.

Materials

With your fur colour yarn and 2.25mm needles cast on 13 stitches - leaving a tail of around 5 inches for sewing up later.

Purl the first row and knit the next. Continue in stocking stitch until work measures 1.5 inches (4cms), approx 18 rows in total.

Step1

Cut the work from the ball of yarn leaving around 6 inches for sewing up and thread a needle with this end. Thread the cast off end through the stitches on the needle.

Step2

Now take your small circle of felt and place at the back of the work behind where you plan to embroider the face. Using the pink yarn embroider a small nose in centre of face - I use 1 stitch across and 1 small stitch downwards. Knot the yarn at the back of the work and trim ends off. Now add the eyes with the black yarn - you can tie a small knot in the thread to make the eye stand out. Again knot the thread at the back of the work and tie ends securely trimming off excess.

Step3

Place a small ball of stuffing behind face and join the back seam of the body using mattress stitch (follow link & scroll down). Tie a length of yarn tightly around the body around half way up to give your toy a neck and thread ends through the body before trimming off excess (if you prefer a neater finish to the neck see an alternative method here). Stuff the body cavity. Thread a needle with the cast on tail and use this to catch up the loops around the bottom of the body.

Step4

Pull up tightly to gather seam and seal body cavity. Tie off tightly and thread ends through the body before trimming off excess.

Now make the limbs (4 the same). Cast on 4 stitches with the double pointed needles and knit a short i-cord - around 6 - 8 rows in length. Cut the work from the ball and thread end through the stitches on the needles and then through the middle of the work - knotting it securely to the cast on tail.

Step5

For rabbit ears cast on 5 stitches.
K1, P1, K1, P1, K1 - repeat this row 5 times more to give 6 rows from cast on.
7th row: K1, P3 together, K1
8th row: K1, P1, K1
9th row: K1, K2 together, pass 1st stitch over.

Cut the work from ball of yarn and thread the end through the last stitch to cast off. Using the cast off tail thread this through the centre of the ear and tie to cast on tail.

Step6

(To make ears for a bear cast on 3 stitches, knit 1 row, cast off 3. Tie cast on and cast off ends together tightly and sew in place.)

Assemble all of the body parts.

Step7

Join the ears to the top of the head with a few stitches. Knot ends securely together and thread through the body before trimming excess.

Step8


Repeat with all of the limbs. And there you have an itty, bitty bunny!

Finished

And if you fancy you could make your teeny tiny toy a little snack:

Tinies_2

Teeny iced bun:
using a bun-coloured wool (preferably 4ply / fingering weight) and US 0 / 2.0 mm needles cast on 3 stitches
P3
K1, YO, K1, YO, K1
P5
K1, YO, K1, YO, K1, YO, K1, YO, K1
P 9
K 9
P 9
K2tog through the back twice, K1, K2tog twice
P 5
K2tog through the back, K1, K2tog
P 3
K1, K2tog, pass 1st stitch over, and pull end through to cast off

Tie both cast on and cast off ends together and thread a needle with one end, gathering the edges in to make a ball - stuff with a short length of same colour yarn. Tie off the ends and thread through the ball before trimming off.

Cut a small circle of felt, sew a seed bead in the centre as a cherry, tie off and trim thread ends on the back. Sew the felt circle over the sewn up end of the knitted bun.

Sinine tibu

Selline naljakas sinine tibu, originaal Rhythm of The Home ja leitud blogist Naturalsuburbia.
This Bluebird of Happiness pattern is knitted with The Magic Loop method of knitting with circular needles.
Materjal:
Mohäär
Ringvardad
Sukanõel
Pruuni lõnga noka jaoks
Viltimisnõel ja musta heiet silmade viltimiseks

Õpetus:
Loo ringvarrastele 9 silma (koo parempidist kudet edaspidi). Õhenda silmad ringiks ja pane mustrimärkija rea algusesse
Rida1: Koo PP.
Round 2: Kasvata igast silmusest üks lisasilmus (18 silmust).
Round 3: Koo PP.
Round 4: Kasvata igast silmusest üks lisasilmus (36 silmust).
Read 5-11: Koo PP
Round 12: (1PP, 2 kokku) nii terve rida.
Round 13: Koo PP
Round 14: (1PP, 2 kokku) nii terve rida.
Round 15: Koo PP.
Round 16: Koo igast silmusest 1 lisasilmus.
Rida 17-20: Koo PP
Round 21: (2 kokku) korda rea lõpuni.
Katkesta lõng, võta nõela abil kõik silmused lõngale ja jäta nii, kuni linnu täis toppimiseni.

Saba:
Saba kootakse PP koes.
Loo 3 silma
Koo 6 rida.
Loo juurde 1 silmus rea alguses ja lõpus
Cast on 1 stitch at the beginning and end of the row.
Koo 3 rida.
Knit 3 rows.
Koo maha
Cast off.
Tiivad:
Wings:
Koo PP koes
Knit wings in garter stitch (plain)
Loo 5 silma
Cast on 5 stitches.
Koo esimene ja teine rida.
Knit first and second row.
Rida 3: lisa 2 silmust rea algusesse ja lõppu
Row 3: Cast on 2 stitches at the beginning of the row and 1 stitch at the end of the row.
Rida 4: Koo PP
Row 4: Knit.
Rida 5: Lisa 1 silmus rea alsuse, koo 2 kokku rea lõpus.
Row 5: Cast on 1 stitch at the beginning and knit 2 together at the end of the row.
Rida 6: KooPP
Row 6: Knit.
Rida 7: Koo 2 kokku rea alguses ja koo rea lõpuni.
Row 7: Knit 2 stitches together at the beginning of the row, knit to the end of the row.
Rida 8: KooPP
Row 8: Knit.
Koo maha
Cast off.


Fill your bluebird with soft fleece and ensure he is wonderfully firm, shaping him as you go. Take your needle and thread it through your stitches and pull firmly closed and finish off.

Shape your bluebird gently, by pushing more fleece to the back as can be seen in the photo.


Sew on wings and tail.


To make the beak, sew a loop in brown wool and weave in and out through the loop and finish off.

(Please note this pattern is for non-commercial purposes only)

Needle felt on two black eyes with fleece and a felting needle.

MunaKana

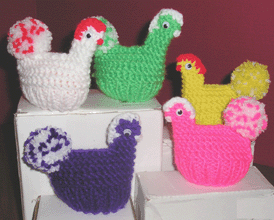
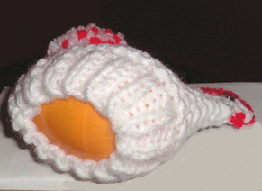
Sellised vahvad kootud Munadepüha kanad. Vahva lauakaunistus, mis tasub järeleproovimist. Allikaks inglise keelne Knitting Patterns.

Knitted Easter Chick

Knit Chick Stuffed
With Plastic Filler Egg

Materials Needed

  • 1 oz. Knitting Worsted Weight Yarn, your choice of color
  • Small amount contrasting color Knitting Worsted Weight Yarn
  • #6 Knitting Needles - 10"
  • 1" Pom Pom Made from both colors yarn
  • Crochet Hook Size E
  • 2 - 7mm wiggle eyes

    Directions:

  • Cast on 30 Stitches.
  • Rows 1-6: Knit 1, Purl 1
  • Row 7: Knit across row.
  • Rows 8-14: Knit rows
  • Row 15: Bind off 11 stitches, knit across
  • Row 16: Bind off 11 stitches, knit across
  • Rows 17-21: Knit.
  • Row 22: Bind off.

    Fold knit piece in half. Sew piece together, beginning at top of head, across back and
    down back side. Do not sew bottom together.

    With Crochet Hook and contrasting color, sc several stitiches across top of head (for
    Chicken Comb) and several stitches down back of neck. Bind off. Make 2 sc on front
    of face for beak.

    Sew pom pom to back side of chick. Glue one eye on each side of head. Stuff with plastic egg.

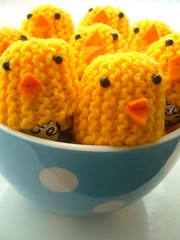
  • Nüüd üks tibu Anjie Davidsoni blogist pom pom Emporium. Free Pattern.

    Easter chick with creme egg body

    To make a chick you will need...

    1. Small amount of yellow DK yarn
    2. A pair of needles UK size 3.75mm / 9 / US 5
    3. Small amount of stuffing for the head
    4. Small piece of felt for the beak
    5. Chocolate egg, plastic or hard boiled!

    Body:

    Cast on 26 stitches.

    1. Row 1: K1, increase 1, K to the end.
    2. Repeat first row until you have 36 stitches on the needle (10 rows)
    3. Knit four rows. (14 rows)

    Shape the tail:

    1. Row 1: K3, bring yfwd, slip next stitch, ybk, move slip stitch back to left needle. Turn
    2. Row 2: K3 to end
    3. Row 3: K2, bring yfwd, slip next stitch, ybk, move slip stitch back to left needle. Turn
    4. Row 4: K2 to end
    5. Row 5: Cast off 10 stitches, K to end
    6. Repeat last five row for the other side to shape tail.
    7. You will have 16 stitches left in the centre of your knitting.
    Head:
    1. Rows 1-4: Knit
    2. Row 5: K1, K2tog, K to last three stitches, K2tog, K1.
    3. Rows 6-8: Same as row 5
    4. Rows 9-10: Knit

    This will leave you with 8 stitches. Cut the yarn leaving a length 30cm (12") long.Thread a needle with the 30cm length and run it through the 8 remaining stitches, pull them tight. Continue with the yarn to sew up the head, back and side leaving a hole big enough to insert an egg. Stuff the head lightly. Insert the egg, this will give you the body shape making it easy to see where the neck should be. With a needle threaded with the yarn, do a running stitch to cinch the neck (not too tight) fasten off securely. The eyes are french knots made from black yarn. Sew on a beak made from red felt

    Fluffy Chicks

    Using my basic Chick Pattern I made some fluffy additions, see them here. I used Fancy Yarn (Fur) instead of the DK yarn and a pair of size 3.75mm (9 UK, 5 US) size needles, you may require larger or smaller size needles, depending on your knitting tension.


    View Image Details]" style="color: rgb(73, 78, 71); text-decoration: none; ">This is how the chick pattern should look before being sewn up

    View Image Details]" style="color: rgb(73, 78, 71); text-decoration: none; ">Easter chick with creme egg body

    View Image Details]" style="color: rgb(73, 78, 71); text-decoration: none; ">An alternative fluffy chick

    Knit Chick


    Size 8 knitting needles
    yellow knitting worsted yarn
    Instructions for chick to fit over a large plastic egg. (Instructions for chick to fit regular size plastic egg or hard boiled egg in parentheses.)
    Cast on 32 (24) sts.
    First 4 (3) rows: K2, P2 across.
    Next 14 (10) rows: K across.
    Next row: Bind off first 10 (7) sts, then K remaining 22 (17) sts.
    Next row: Bind off first 10 (7) sts, then K remaining 12 (10) sts.
    Next 10 (6) rows: K across.
    Bind off, fold in half, sew together with yarn.
    Add features: small bead for eyes, red felt comb, orange beak, yarn loops for tail.


    gave these to my friends for easter. i thought chicks were appropriate because they're not too easter-y and once the creme egg's gone (which is very very quick) they can be used as egg cosies to keep non-chocolate eggs warm. Smiley
    i was inspired by the egg cosies posted last year, but i winged a short-row pattern so that i had less seaming. here's roughly what i did:

    cast on 10 sts
    row 1: k8, wrap and turn
    row 2: k across
    repeat rows 1-2 until the 'top' looks circular (try fitting an egg into the half-knitted cosy & see if the two edges meet at the top). then:
    row 3: k7, wrap and turn
    row 4: k across
    row 5: k6, wrap and turn
    row 6: k across
    cast off

    i find in casting off that it looks neater if, when you reach the last two sts, you pull the loop on the right needle THROUGH the loop on the left needle. then just sew up the seam, weave in the ends and sew on beads for eyes and a piece of felt for the beak.

    hope that's clear. happy easter!

    Thursday 6 January 2011

    Munakorvid cernitist

    Munaalus – õpetus

    Kevad on juba peaaegu käes – päevad on pikemad, päike paistab, jääpurikad sulavad ja aknast piiludes paistab juba ka veidike asfalti. Teadagi seostub kevad meile kohe kevadpidustustega ehk siis munadepühaga. Sellepärast meenutan teile, et meil on olemas üks ülespildistet õpetus sellest, kuidas valmistada munaaluseid.

    Vähesed töö- ja abivahendid – Sculpey III šokolaadivärvi, valge, samblavärvi ja veidi punast, saviprits (saab ka ilma), lõiketera, tööriist, hambatikk. Puuduvad vaid muna ja veidi fooliumi.

    Silma järgi võtsin valget ja šokolaadivärvi Sculpey III, mudisin seda näppude vahel seni, kui sain vajaliku värvi. Panin savi savipritsi ja hakkasin pigistama.

    Siin tuleb mängu muna ja foolium. Fooliumist tegin munale väikese pesa, et see sinna otsapidi seisma panna. Vorstikese lõikasin kaheks ühepikkuseks vorstiks ja kruttisin nad omavahel kokku. Seejärel sättisin selle muna “pepu” peale. Alguses jäi veidi “korvi”materjali puudu, nii et pidin juurde tegema.

    Lõikasin ühe suurema tüki valget ja rullisin selle õhukeseks loperguseks leheks. Panin korvikese valge peale ja märkisin ära piirjooned ning seejärel lõikasin südamiku välja. Hiljem veel lõikasin välimised ääred parajaks.

    Näpistasin tüki punast ja veeretasin selle peenikeseks vorstiks. Seejärel lõikasin vorsti küljest väikeseid tükke ja veeretasin neist väikesed pallid. Pallid asetasin sümmeetriliselt valgele savile.

    Et tekitada mummulise kanga efekti, asetasin valgele punaste pallidega savile paberi ja rullisin seda veidi.


    Mummulise “kanga” sättisin ettevaatlikult “korvi” ääre külge. Kui “korv” loperguseks muutus, pange sinna sisse muna.

    Kui soovite, võite lisada sinna ka mingid kaunistused – mina tegin kaks lehte ja tibu nende peale.

    Tulemus on siin:

    Minu munaalus on lakkimata, aga teie võite seda teha, kui soovite.